Installing Clowder
What type of user are you?
For most users of Clowder: Get started here 👇
For developers of Clowder itself: Dev quickstart here 👇
Build Clowder from source via IntelliJ’s Play-2 run configuration.
Run the required services via Docker.
For production instances of Clowder, a Kubernetes deployment is recommended and manual installations are being phased out.
Otherwise, manually install Clowder, and each of it’s required services (at a minimum: MongoDB, ElasticSearch, RabbitMQ). See requirements below for details.
Users of Clowder: Getting Started via Docker
Install Docker Desktop (if you haven’t already)
Clone or download Clowder on Github (use the default
developbranch)
git clone https://github.com/clowder-framework/clowder.git
Navigate to Clowder’s root directory in your bash command line (
cd clowder)Start Clowder using the Docker Compose configuration, via your command line
docker-compose up -d
If you experience any issue with file uploads and see the below error message in the console:
[ERROR  ] - application - Could not create folder on disk /home/clowder/data/uploads/xx/xx/xx
[ERROR  ] - application - Could not save bytes, deleting file xxx
you can try this command:
docker-compose exec -u 0 clowder chmod 777 /home/clowder/data
Open your web browser to
localhost:8000
If you see Error 404, allow a minute for it to appear.
Note: use port 8000 for docker run. However, port 9000 for manual builds.
⭐ If you experience any trouble, come ask us on Slack here! ⭐
Helpful docker commands
docker-compose up -d- start up all required servicesdocker-compose down- stop all docker containersdocker-compose logs -f- see the logsdocker ps- check how many services are runningdocker info- details about your docker versionAfter starting Docker, check that your services are running via the Docker Desktop GUI, or run
docker psand check that 3 containers are running.The “image” column should show
rabbitmq,elasticsearchandmongo.
Clowder started! Now create a new user 👇
Sign up for a Clowder login account
After installing Clowder, you still need to sign up for a user account.
Run this in your terminal to create a new account:
docker run --rm -ti --network clowder_clowder -e \
   FIRST_NAME=Admin -e LAST_NAME=User \
   -e EMAIL_ADDRESS=admin@example.com -e PASSWORD=catsarecute \
   -e ADMIN=true clowder/mongo-init
Optionally, edit these properties to your liking:
FIRST_NAME
LAST_NAME
EMAIL_ADDRESS
PASSWORD
ADMIN (only set this if you want the user to have superadmin rights, make sure at lease one user has this).
✅ Configuration complete! Now you can login to Clowder via localhost:9000 in your browser.
Warning
If you renamed the base clowder folder to something else, like kitten, then the --netowrk parameter must be changed to --network kitten_clowder.
All done! You should be able to login to your new account, create new Spaces & Datasets and upload many different types of data.
Note
Before you go, check out useful information like the Clowder ‘All Paws’ YouTube playist.
and 28 total videos covering specific Clowder topics and uses!
Try the default extractors for simple quality of life improvements in Clowder.
$ docker-compose -f docker-compose.yml -f docker-compose.override.yml -f docker-compose.extractors.yml up -d
Clowder Developers: Getting Started
For Clowder developers, a hybrid is recommended:
Part 1: Run the required services via Docker, and expose each of their ports to Clowder.
Part 2: Run the Clowder instance manually via IntelliJ Ultimate’s Play-2 run configuration.
Part 1: Setup Docker
Install Docker (if you haven’t already)
Clone Clowder’s
developbranch (the default)
git clone https://github.com/clowder-framework/clowder.git
Apple Silicon M1 users, additional instructions here 💻👈
Clowder works well on Apple Silicon, with only one minor caveat. No changes are necessary, but these optimizations are handy.
Elasticsearch does not work and so the search bar in the top right of the web interface will not work or be visible. Clowder depends on an older version of Elasticsearch before it added Apple Silicon support, and Docker’s QEMU emulation of x64 happens to fail causing the container to infinitely crash and restart.
To prevent this container from constantly crashing and restarting,
please comment it out of the Docker definition in docker-compose.yml.
# COMMENT THIS OUT in docker-compose.yml:

# search index (optional, needed for search and sorting future)
elasticsearch:
  image: clowder/elasticsearch:${CLOWDER_VERSION:-latest}
  command: elasticsearch -Des.cluster.name="clowder"
  networks:
    - clowder
  restart: unless-stopped
  environment:
    - cluster.name=clowder
  volumes:
    - elasticsearch:/usr/share/elasticsearch/data
Additionally, you may have to install Scala and SBT on your Mac.
brew install scala sbt
Finally, there is no need to specify a ‘default Docker platform, and could hurt performance. (i.e. <DO NOT> export DOCKER_DEFAULT_PLATFORM=linux/amd64.’) Only the necessary Docker containers will automatically emulate x64, and the rest will run natively on Apple Silicon.
Expose Docker services’ ports to Clowder
In order for Clowder to access the required services (at a minimum: MongoDB, ElasticSearch, RabbitMQ. See Requirements for details.), we must tell Clowder which ports the services are using.
Create an override file, where we will store the port information
# navigate to Clowder base directory
cd clowder
# create new file docker-compose.override.yml
touch docker-compose.override.yml
Copy and paste the lines below into that file we just created
docker-compose.override.yml
Test that our services work! First start them:
docker-compose up -d
Note
By default, running docker-compose up -d uses the docker-compose.yml configuration and will apply overrides found in docker-compose.override.yml. Neither file need to be specified on the command line.
(Optional) Check that the Docker containers are running
You can see them in the Docker Desktop application, or in the web browser shown below.
localhost:27017
- You should see: “It looks like you’re trying to access MongoDB…” Success!
localhost:15672
- You should see: the RabbitMQ login screen (no need to login tho!). Success!
Now keep everything running, and next let’s build Clowder from source 👇
Part 2: Run Clowder via IntelliJ
Install IntelliJ Ultimate Edition.
This guide will assume developers use IntelliJ. Ultimate Edition is required for the Play2 configuration.
Open the base Clowder directory & install Scala plugin
This should prompt you to install the Scala plugin! Install it.
Or, manually install the Scala Plugin for IntelliJ
File–>Settings–>Plugins–>Download Scala.
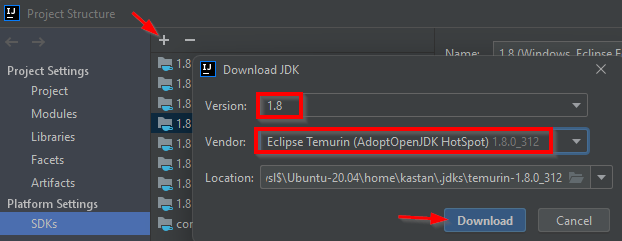
Install Java 8 (i.e. Java 1.8) on your computer. Clowder requires Java version 8 and is not compatible with other versions.
I find this easiest to do via IntelliJ’s Plugin Manager.
File–>Project Structure–>SDKs–>+icon –>Download JDKSelect
Version 1.8(Clowder is only compatible with Java 8 (1.8), nothing higher) –> Vendor:Eclipse Temurin (AdoptOpenJDK Hotspot)–>Download.Alternatively, download the JDK online at AdoptOpenJDK. Java 8, HotSpot.
Then point IntelliJ to the JDK folder under
Project Structure–>SDKsand specify the root folder of the JDK you just downloaded.
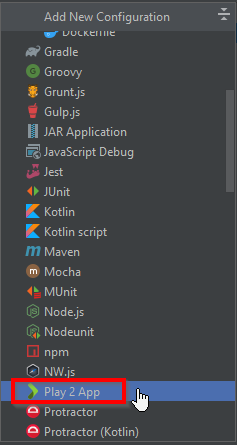
Add a new Run Configuration
In the top right, click the dropdown and click “Edit Configurations…”

Create a new
Play 2 Appconfiguration
Note
If you don’t see Play 2 App in the list, ensure you have the Scala plugin installed. If Play2 still isn’t there, you may need to use IntelliJ Ultimate version (instead of Community). I experienced this bug, feel free to ask in the Clowder Slack here.
The default run configuration should be okay, see image below.

The default Clowder run Configuration.
Note
Later, if Clowder feels slow (multiple seconds per page load) then you will need to add JNotify to your JVM Options on this page. See the instructions at bottom of this page.
⭐️ Now start Clowder: In IntelliJ, click the green play button ▶️ (top right) to build Clowder from source! Give it a minute to finish. Access Clowder via localhost:9000 in the browser.
Also note, a handy debugging mode is enabled by default. You can run the debug mode by clicking the green “bug” 🐞 button right beside the play button.
Creating a local Clowder account
After installing Clowder, you still need to sign up for a user account.
Run this in your terminal to create a new account:
docker run --rm -ti --network clowder_clowder -e \
   FIRST_NAME=Admin -e LAST_NAME=User \
   -e EMAIL_ADDRESS=admin@example.com -e PASSWORD=catsarecute \
   -e ADMIN=true clowder/mongo-init
Optionally, edit these properties to your liking:
FIRST_NAME
LAST_NAME
EMAIL_ADDRESS
PASSWORD
ADMIN (only set this if you want the user to have superadmin rights, make sure at lease one user has this).
✅ Configuration complete! Now you can login to Clowder via localhost:9000 in your browser.
Warning
If you renamed the base clowder folder to something else, like kitten, then the --netowrk parameter must be changed to --network kitten_clowder.
Skip to using default extractors and developer resources 👇
(Optional) User creation method 2: mock SMTP server
Enable local email verification
For local instances of Clowder, the email verification step will have to be done manually, via a mock SMTP email server.
Add the following lines to the bottom of application.conf:
# application.conf

# ~~~~~~~~~~~~~~~~~~~~~~~~~~~~~~~~~~~~~~~~~~~~~~~~~~~~~~~~~~~~~~~~~~~
# Local email verification -- see Intellij's run console to complete registration
# ~~~~~~~~~~~~~~~~~~~~~~~~~~~~~~~~~~~~~~~~~~~~~~~~~~~~~~~~~~~~~~~~~~~
smtp.mock=true
All accounts must also be activated by an administrator. To activate
your account by default, edit application.conf:
# application.conf
# Search for this line, and EDIT it (do not add a new line)
# Set to false

# Whether emails for new users registrations go through admins first
registerThroughAdmins=false
Now, create a local Clowder account via the web interface
Start Clowder:
Start required services (via
docker-compose up -dfrom the root Clowder directory).You can check if your services are already running using
docker psand check that 3 containers are active (MongoDB, ElasticSearch, and RabbitMQ) by looking atServer → Containser: 3. Or check via the Docker Desktop GUI.
Ensure your local clowder instance is running (on
localhost:9000)
Finally, attempt to signup for an account via the Clowder GUI on
localhost:9000
Click the Sign Up button in the top right.
Upon clicking Signup, the IntelliJ console will show the text of the user signup verification emails, where you can click the confirmation link.
Look for this in Intellij’s run output terminal, and click the link to complete registration:
<p>Please follow this
    <a href="http://localhost:9000/signup/baf28c54-80fe-480c-b1e4-9200668cb92e">link</a> to complete your registration
    at <a href="http://localhost:9000/">Clowder</a>.
</p>
Don’t see it? Make sure you enabled
smtp.mock=trueabove.
Now fill in your account details, and you should be good to go using Clowder!
(Optional) Edit user properties directly in MongoDB
To edit the permissions on existing accounts, edit their properties in MongoDB. You can skip this step if you haven’t created a local Clowder account yet.
Download a GUI for MongoDB: MongoDB Compass or a 3rd party tool like RoboMongo.
Ensure all services are running!
cd clowder # base directory

# start all required services
docker-compose up -d
Connect RoboMongo to the docker instance (the defaults should be fine)
Point it towards port
27017
To find user properties, in the file tree on the left, navigate to clowder → Collections → social.users
Then click the dropdown to expand that user
Find
statusfield, and right click to edit.If it is
Inactive, change it by typingActive(capitalized).
User is activated. Refresh your browser (on
localhost:9000) to access Clowder.
If Clowder feels slow, add the faster JVM option
Follow the instructions here to add JNotify.
Simply download JNotify and tell IntelliJ where it is in the
Run Configurations->JVM Options.
Use the default extractors
The default extractors offer simple quality of life improvements for image, video, pdf, and audio file previews while browsing Clowder. Extractors also offer powerful capabilities for manipulating your data in Clowder, see PyClowder for additional capabilities, including running machine learning training on your data stored in Clowder.
Enable the default Extractors:
# start Clowder with extractor support
docker-compose -f docker-compose.yml -f docker-compose.override.yml -f docker-compose.extractors.yml up -d
Or run NCSA GeoServer for viewing and editing geospacial data via docker-compose.geoserver.yml:
geoserver
ncsa_geo_shp
extractor-geotiff-preview
extractor-geotiff-metadata
# start Clowder with default extractors, and GeoServer extractors
docker-compose -f docker-compose.yml -f docker-compose.override.yml -f docker-compose.extractors.yml -f docker-compose.geoserver.yml up -d
Learn more about GeoServer and read the documentation.
Troubleshooting extractors
First, make sure you include the extractors when starting Docker! See docker-compose.extractors.yml in the section above.
If running the extractor results in a "Failed to establish a new connection: [Errno 111] Connection refused", this is a Docker networking issue. Containers must be able to talk to each other (Clowder talking to RabbitMQ).
To resolve, open clowder/conf/application.conf search for and set the RabbitMQ message queue URL:
clowder.rabbitmq.clowderurl="http://host.docker.internal:9000"
Simply saving the file should fix the issue. You can again “submit a file for extraction” on the file’s details page. Done!
If navigating to localhost:9000 yields nothing, try this. On Windows, I’ve had trouble getting localhost to resolve to the Docker host, so:
Access Clowder not via localhost, but via your local IP address. For example,
55.251.130.193:9000.- Find your local IP address:
Windows:
Settings->Network & internet->IPv4 address.Mac:
System Preferences–>Netowrk–>Advanced–>TCP/IP–>IPv4 Address. (Note: don’t use the ‘Public IP’ from iStat Menus).Linux
$ ifconfig
That should resolve extractor issues across all major platforms, including Apple Silicon (M1).
Next Steps
Watch the Clowder Conference playlist on Youtube!
28 videos covering specific Clowder topics and uses
Check out How to Create a New Extractor and many more!
Try the default extractors for simple quality of life improvements in Clowder.
docker-compose -f docker-compose.yml -f docker-compose.override.yml -f docker-compose.extractors.yml up -d
Write your own extractors using the PyClowder Python package.
🤔❓ Please ask any questions on our Clowder Slack.
Resources for Developers
Look at the Core Extractors for exmaples on how to use image, video, audio, PDF, etc.
Virus checker extractor (to ensure datasets don’t have viruses)
Can’t find what you need? Clowder’s legacy wiki may have additional detail.
Requirements Overview
Following is a list of requirements for the Clowder software. Besides Java, all other services/software can be installed on other machines with Clowder configured to communicate with them.
Java 8 - required
The Clowder software is written in Scala and javascript and requires Java to execute.
Clowder has been tested with the OpenJDK.
Versions beyond 8 have not been tested.
MongoDB v3.4 - required
By default Clowder uses MongoDB to store most of the information within the system.
Versions above 3.4 have not been tested.
RabbitMQ (latest version) - optional
RabbitMQ is used to communicate between Clowder and the extractors. When deploying extractors it is required to deploy RabbitMQ as well.
ElasticSearch 2.x - optional
ElasticSearch is used for text based search by Clowder.
Versions above 2.x have not been tested.
This dependency (specifically v2) is not compatible with Apple Silicon M1.